Home

Showing posts with label plans. Show all posts

Wednesday, January 30, 2013

Project: One Week - One Army. Part 3

To confess a defeat is never easy, but sometimes inevitable. The weekend was filled with work, not just painting, but also making scenery (not for me, so I unfortunately forgot to make some pictures).

At the beginning everything looked good. I deflashed my miniatures and made some minor conversions. Note the red spears of the cavalry and triairii. They are made of brooms and are much more durable than the soft plastic spears. The legionaries kept their pilum, because it's much shorter and is very detailed.


The next step was priming. I primed my miniatures in GW skull white, as one should always work with bright colours when using the army painter dip. The horsemen are missing on that picture.


I decided to start with the main bunch of the army, the legionaries. This meant painting 24 similar miniatures. Although I saved time by working on so many figures at once it was also very exhausting and sometimes frustrating. It took me all saturday and sunday to complete them. The picture on the left shows them in WIP status.
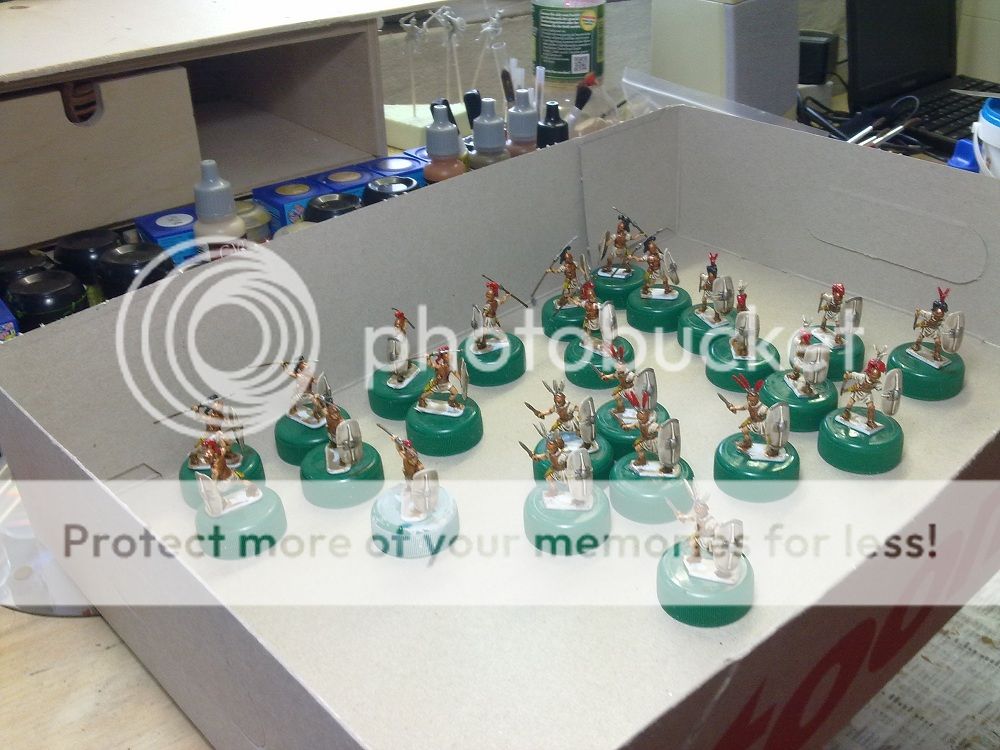


Even though I had a plan, I did not so much on miniatures monday and tuesday. Yesterday evening I applied the dip at last. They need to dry today. After that I'll white their shealds and put on the decal. Then they need to be varnished and based.

I failed my project. It started good, but I underestimated the work and my very own motivation and working speed. I didn't even finished 24 miniatures, not to speak of the whole army. This is of course a bit disappointing.
But I'm an optimist and always look on the positive things in life. The legionaries are nearly finished, the most work is done. I have never painted so many miniatures in such a short amount of time. The army as a whole is pushed a big step forward. And I'm motivated to get the rest done. So, in the end, not everything failed.

Thursday, January 24, 2013

Project: One Week - One Army. Part 1

Hello and welcome on my blog!

This time I want to start a project and share it with you. The title is, as you may have seen, 'one week - one army'. To be more precise: I want to paint a polybian Roman army for DBA in one week, starting today the 24th of January 2013. I'll show the whole way, from deflashing, priming, painting, dipping, finishing and basing. First I have to admit that I already cheated because I have done two elements of skirmishers (called psiloi in DBA) in November

The background of my project is the following: a friend and I want to present a participation game on a wargames convention (the Do or Dice in northern Germany, 14th April 2013). Our theme will be the (first) battle of Ausculum 279 BC, which was fought between Pyrrhos of Epiros and the Roman republic. We have enough Greeks and Macedonians, but no Roman army! So my will hopefully visit me one the weekend and we both will only do one thing - painting (and probably some other hobby stuff as well).

Romans of the Pyrrhic wars. Picture from Johnny Shumate.

1. The beginning

I want to start with the DBA army list for polybian Romans. It requires: 1 cavalry (general), 1 cavalry, 6 blades (principes and hastati), 2 spears (triairii), 2 psiloi (velites), 1 camp. This means in miniatures: 6 horses, 6 horsemen, 24 legionaries, 8 spearmen, 4 skirmisher and the camp which will be made of 3 tents and 4-8 miniatures (civilians etc.).

My manufacturer of choice is Zvezda because they have everything I need and look very good. For the infantry I take this set. The cavalry is taken from this set. Civilians in the camp are taken from here. I maybe also add some miniatures from this HäT set to the scene. The tents are made from Rusus. I bought them on the Tactica last year (hey are missing in his shop).


The first step will be deflashing. After that I'll remove the paint, as some miniatures were painted before, and wash all of them properly. Then I'll prime them all with GW skull white.

Thursday, February 2, 2012

It's been a while...

Hi there,

it's been a while since my last post. Many bloggers may know my problem: I finished some smaller stuff and forgot to make pictures. I could complete my Panzer IV, an Autoblinda 41, Panzer II and two crewmen for some Sd.Kfz. 251/1. I also re-painted my table, thanks to Björn again, who offered years of experience in scenery-making. It looks much better now, but that also means that I have to repaint my whole scenery too...

I also bought new models - reenforcements for my Red Army, which suffered a heavy defeat from German Panzers sunday (the pictures I made are bad, so I leave them out), an Italian vehicle, some tents and animals. And a hot-melt gun, a very useful tool. I'll hopefully find some more time in the next weeks to show my new models to you!

Russians, Italians, animals and some tents... much work to do. Again. Damn.


On the workbench: a Tiger and two Opel Blitz; the Pz. IV and the two Sd.Kfz. 251/1 are finished.


In the end another important purchase: a tripod! This is particular good for all of us, because now I can (hopefully) take much better pictures. That will also mean, that I'll begin to present my models to you. The first will be my Panzers.


Friday, January 6, 2012

Leisure time = crafting time

Just a small update. I finished a paper for my studies (political science in this case), so I have leisure time until monday. Of course I want to spend it getting something done. So here are my plans for this weekend (today included):

  • finish all my wip Wehrmacht vehicles (3 tanks, 2 trucks + 4 tanks and 2 halftracks with minor workload)
  • finish the bases of my trees (that means drybrushing and flocking)
  • finish my Italian Autoblinda 41 (a recon vehicle)
  • start my Ukrainian village
  • at least prime my Italian infantry
  • base the rest of my Wehrmacht infantry
  • finish the boxes for my tanks
Thats quite much. Damn.

Love and hate - often closely connected

Yesterday, after I wrote my second post here, I returned to my work station to finish my Panzer III (I showed it in my first post). I wanted to try matt varnish on it, so it would be protected from sticky fingers and other things which rub off paint. A friend of mine also used it on his tanks and was satisfied. So I was optimistic and started to apply the varnish. It looked a bit wet even after drying, so I waited a little more. But the wet effect stayed. Now I'm disappointed, because the tank looks darker than before and the dirt I painted lost it's nice dusty look. It's not really a big deal, but if you paint such nice models and they are just the way you wanted them - and than something changes, it can daunt you. In my case it did. 
Before
After

Compared to a similar tank. Note the shiny, wet looking dirt and the slighty darker grey on the left tank.


So, I decided not to varnish my tanks. Only the decals will get some, so they loose their gloss. My poor Panzer will get some new dirt but not more


But that wasn't all I did. I also finished some markers for Disposables Heroes. Just small stones on a one €-cent coin, painted and varnished. Not much, but necessary for a game and they look good on the table.


Last but not least my trees, or, to be specific, their bases:

I was told to make the bases brighter then I normally do and so i did. I like the result (thanks again Björn!). But that lead me to another decision: I have to pimp my table. 
I built it three years ago and I made a mistake, because I painted it very dark by using a black primer and a dark brown as base colour. I liked it in the beginning and so painted all my scenery bases in the same scheme. Today, I regret my decision, but I was too lazy to change all my stuff. However, I will tackle that in the following months, as I am very optimistic at the moment. I will of course show that project to you!